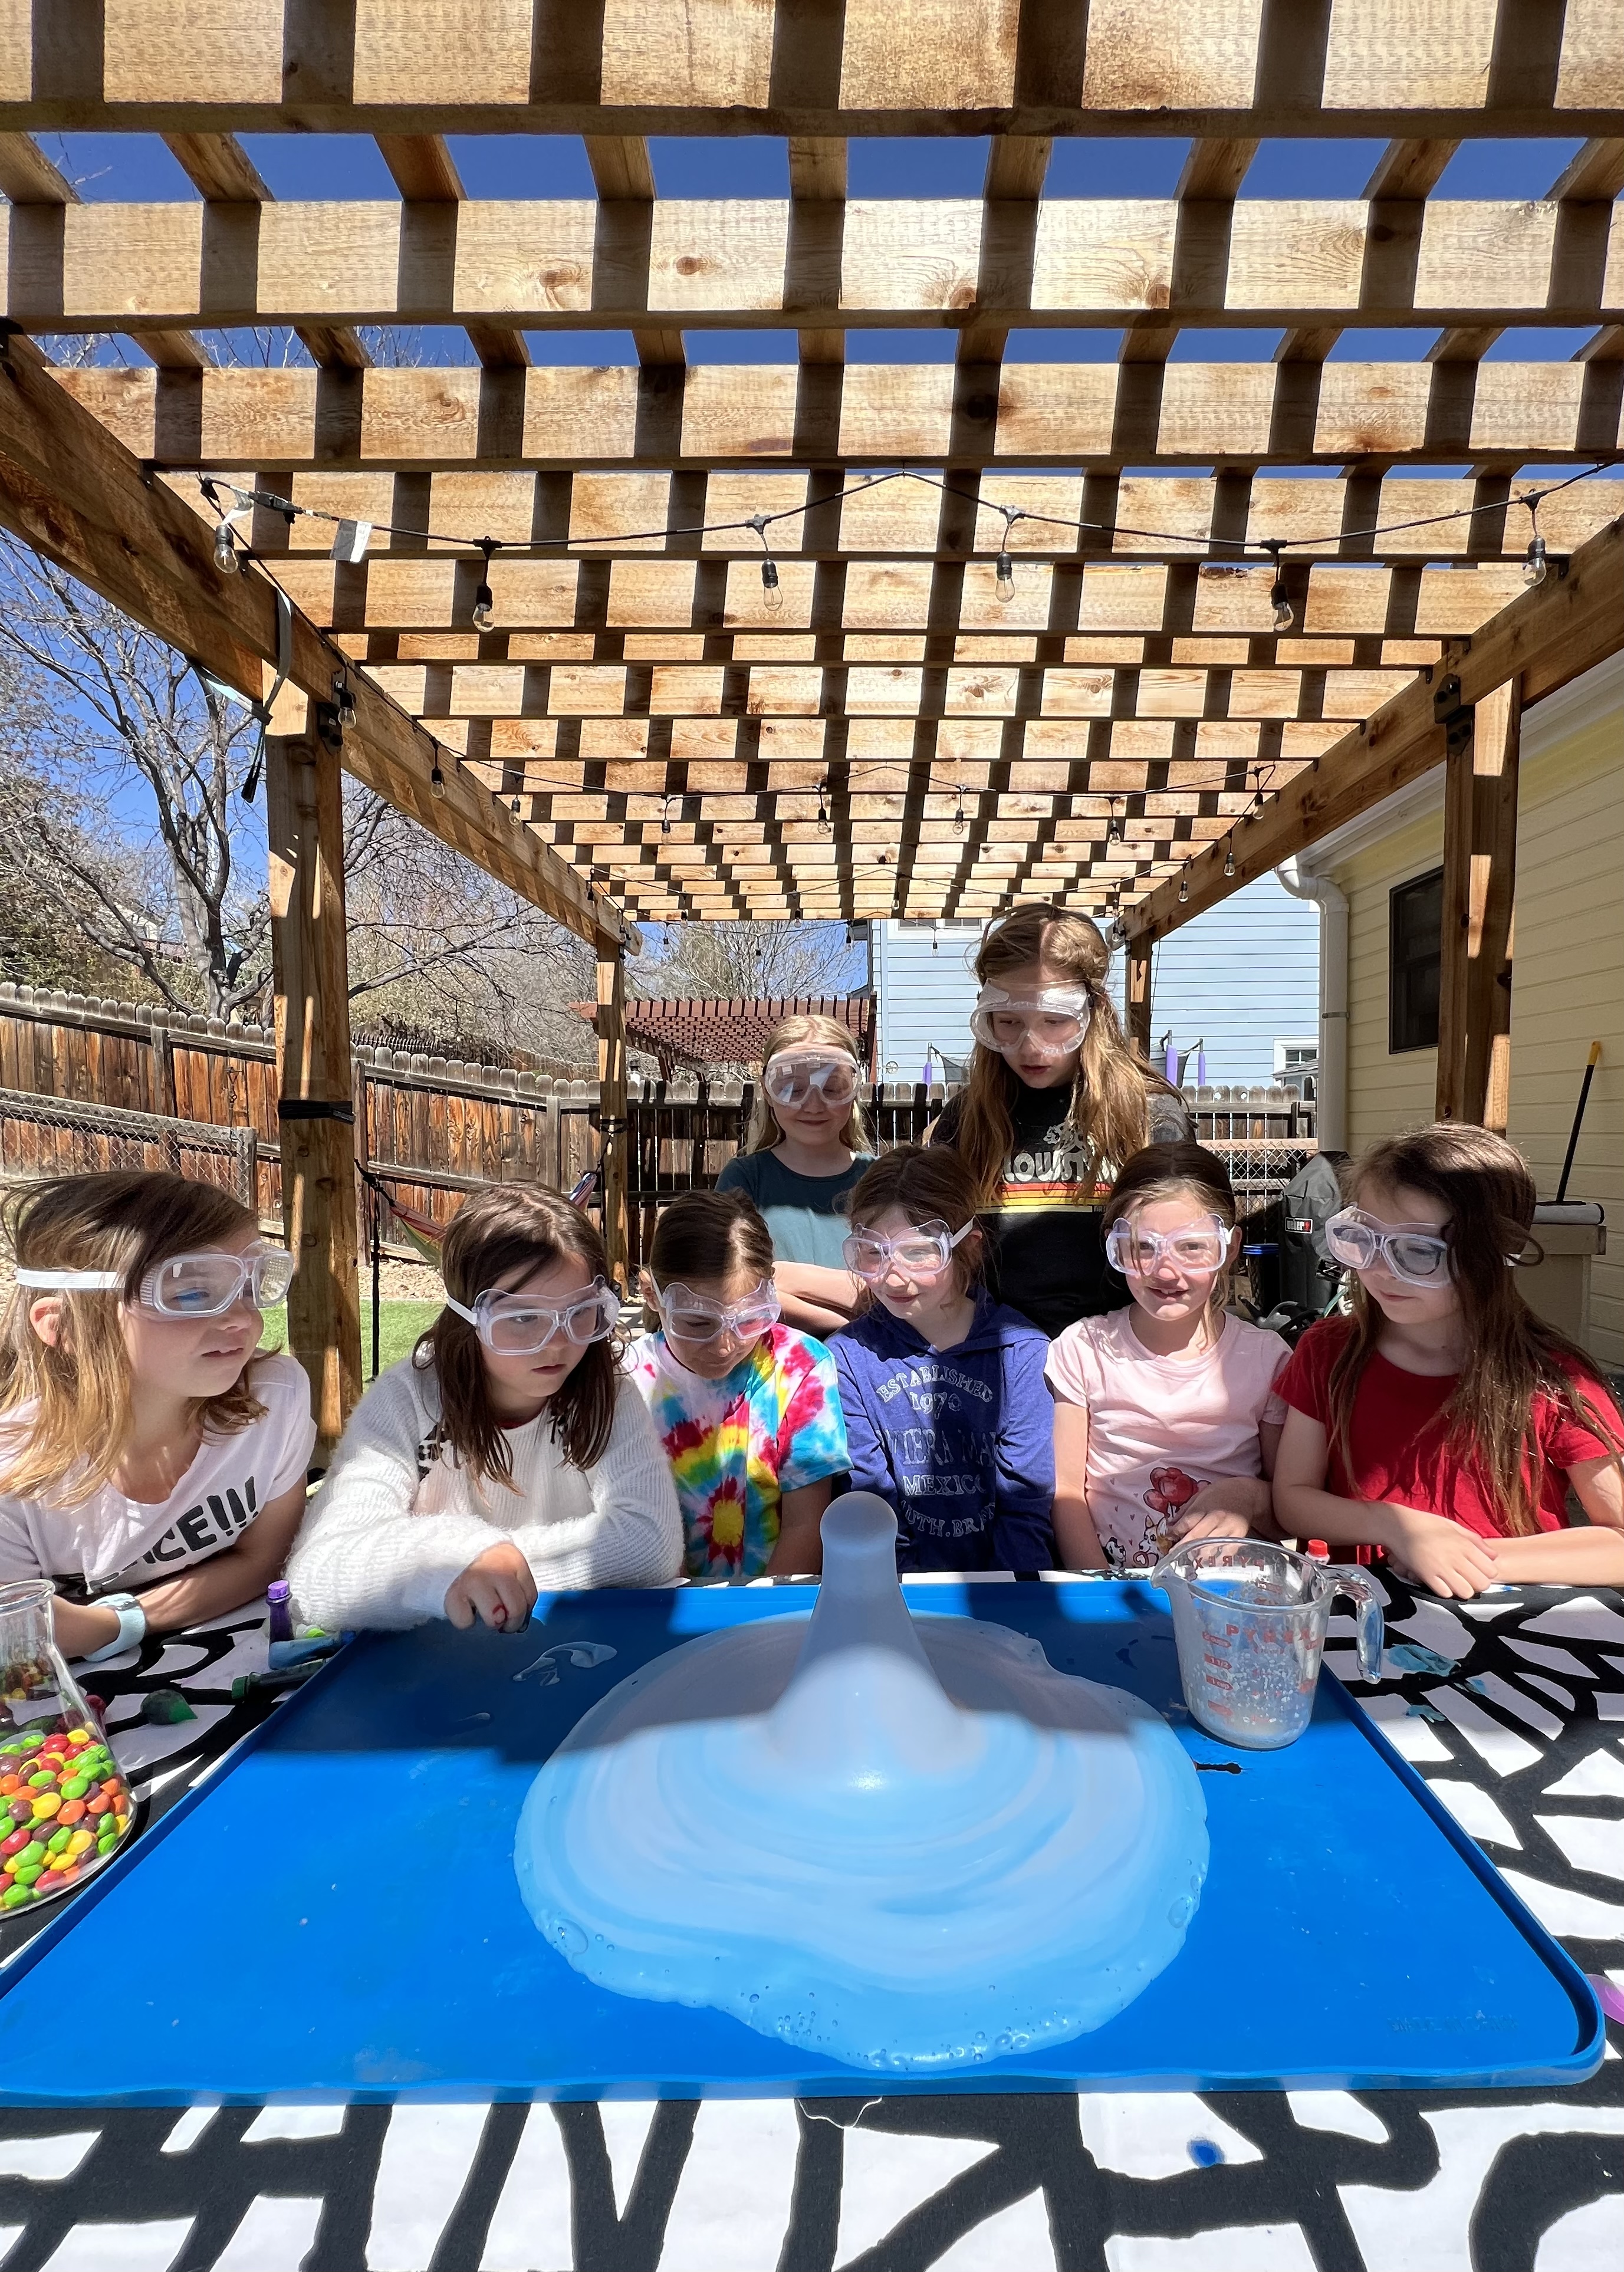
A few weekends back we celebrated Mathilde's 8th birthday with a science themed birthday party.
When Mathilde chose science as the theme for her party I was super excited because I knew it meant we could do lots of fun, colorful and messy experiments with her friends. And what's better than making lots of colorful mess? Not much when you're eight - or even if you're a grown up!
We had all our regular party favorites including a piñata (shaped like an atom) and a themed cake (shaped like a beaker full of a green solution) as well as lots of fun and messy experiments.
Today I'm sharing all the fun along with instructions for the simple experiments we did. If you're thinking of throwing a science themed party for your kiddo (or yourself!) or just interested in seeing all the fun read on...


We started Mathilde's party by decorating fabric party bags with Sharpie marker and isopropyl alcohol to create a tie dye like effect. Her friends used these to take all of their goodies (slime they made, test tubes filled with Skittles and their safety goggles) home at the end of the party. This is one of my favorite kid friendly activities because it combines science and craft, and you can really let your imagination loose.
Tie Dye Party Bags
What you'll need:
Fabric bags (I went with 6" x 8" size)
Cardboard (cut to fit inside the bags)
Sharpie markers
70% Isopropyl alcohol
Eye dropper/pipette
Fabric bags (I went with 6" x 8" size)
Cardboard (cut to fit inside the bags)
Sharpie markers
70% Isopropyl alcohol
Eye dropper/pipette
Start by placing a piece of carboard inside the fabric bag to ensure that the marker and isopropyl alcohol do not go through to the other side. I did this in advance so they were already for the kids to use. Using the Sharpie markers draw your design on the bag. Remember not to add too much fine detail because the color will spread once you add the alcohol. When you're done with the design use an eye dropper to drip the alcohol onto the fabric and watch as the color spreads. The more alcohol you drip onto the design the more the color will spread. Once your done remove the carboard and hang the bag to dry. The alcohol evaporates pretty quickly so the dry time doesn't take too long.


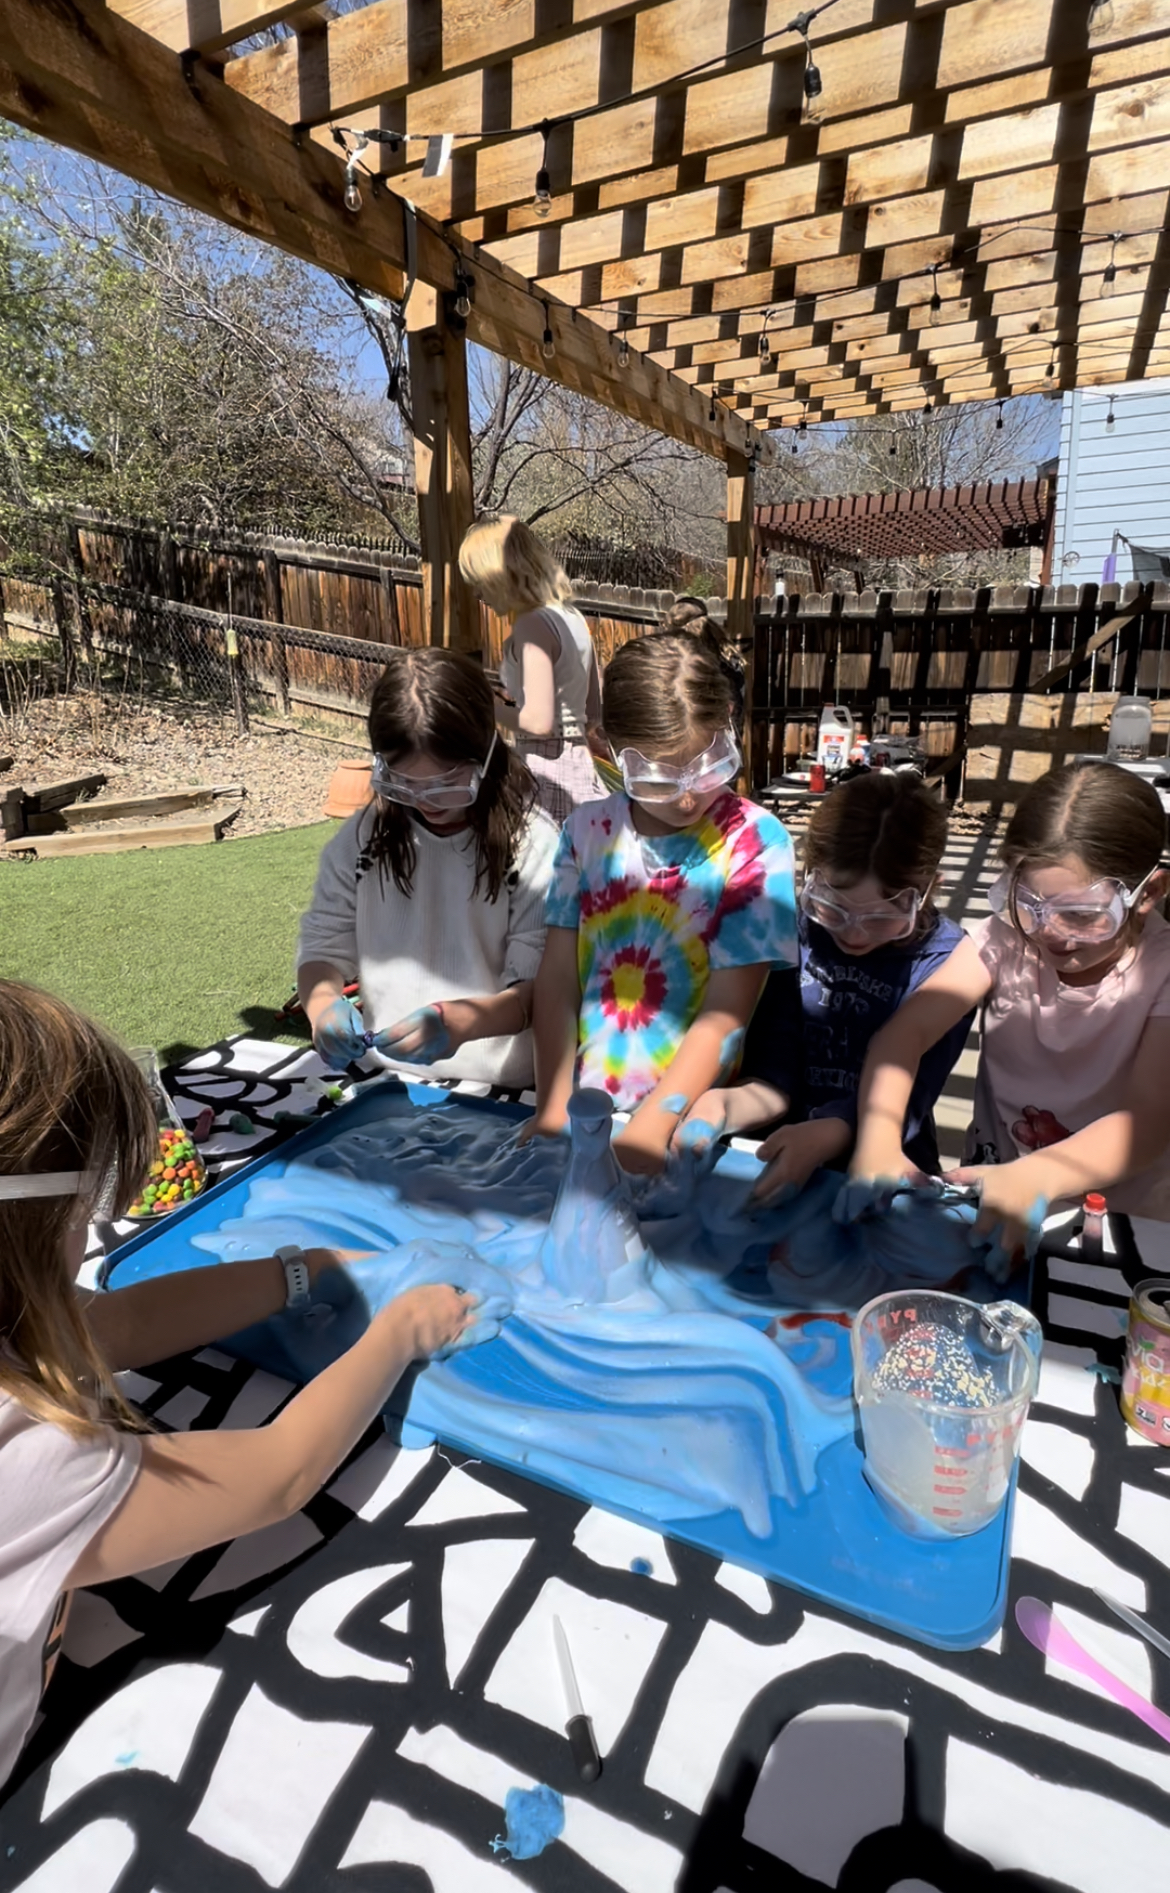
Next up we made every kids' favorite: slime! Usually the kids make slime from scratch with borax, but it's always pretty hit or miss. I wanted to keep things easy so I purchase Elmer's Magical Liquid which, when mixed with Elmer's white school glue, makes slime easy peasy. It was still pretty messy and the kids insisted on adding other ingredients including shaving cream and lotion, but it was definitely easier than working with borax.
Slime
What you'll need:
Food coloring
Optional:
Shaving cream
Lotion
To make slime with Elmer's Magical Liquid you simply need to follow the instructions on the label! Pour four to six ounces of Elmer's glue into a bowl and add a few drops of your chosen food coloring. I find that the cheap liquid food colors work better than gel colors. Stir in two teaspoons of Elmer's Magical Liquid. Keep stirring and add in more of the magical liquid one teaspoon at a time until you're happy with the consistency. Once it's no longer runny and sticky you can start kneading the slime by hand. For a fluffy texture add in some spray shaving cream. Once again, I find that the cheap supermarket shaving cream works best. If the slime is still a little sticky adding a few pumps of hand lotion will help. Once the kids were done making and playing with their slime they packed it away in small storage containers to take home in their party bags.


One of the most popular, and probably the messiest experiments we carried out was elephant toothpaste. You've probably seen videos on YouTube of giant elephant toothpaste explosions, and while those are super impressive, the ingredients aren't so kid friendly. As much as I wanted the elephant toothpaste to make an impressive explosion I was aware that I needed to keep it safe for everyone, so I went with this simple kid friendly recipe I found online. It didn't explode six feet into the air but the kids still LOVED it.
Kid Friendly Elephant Toothpaste
What you'll need:
A glass beaker, jar, vase or tall glass (I used a beaker for more of a science-y look)
Detergent
3% Hydrogen Peroxide
Food coloring
Yeast
Warm water
Silicon mat to contain the mess
There's a little preparation involved for this one. First up pour half a cup of the hydrogen peroxide solution into your beaker or jar. Add a quarter of a cup of dishwashing liquid and a few drops of food coloring. I made the mistake of stepping away while the kids added the food coloring and they squeezed in a whole bottle of blue food coloring! Don't do that unless you want blue kids! Place the beaker on a surface that can get messy. I used my handy Messy Mat for this. The one I have does not seem to be available anywhere anymore (it's simply called Messy Mat and I've had it about ten years) but any large silicone placemat will do. In a separate jug, mix one pack (or 2 1/4 teaspoons) of active yeast with about two tablespoons of warm water. Mix thoroughly and put aside for about five minutes to allow the yeast to activate. When you're ready to carry out the experiment simply pour the yeast mix into the beaker or detergent and hydrogen peroxide and watch it explode out the top. The solution will be a little warm so hold off on touching it for a minute or two, but once it cools down the kids can play with it. Apparently, this was very satisfying according to Mathilde and her friends. It was also incredibly messy given how much food coloring they used. The kids wore safety goggles for protection and in hindsight I really should've given them gloves to wear too. I did actually order small disposable gloves for the party but they were delayed and arrived a few days late. One note for clean up... there is a LOT of washing detergent involved in this experiment, so please make sure you rinse your beaker etc thoroughly before placing them in the dishwasher. The first time the kids and I tried this out I just put the beaker straight in the dishwasher and it overflowed with bubbles several times causing a lot of mess. Also, all that blue food coloring that you can see all over the table cloth from the kids playing with the elephant toothpaste washed right out without any special treatment.


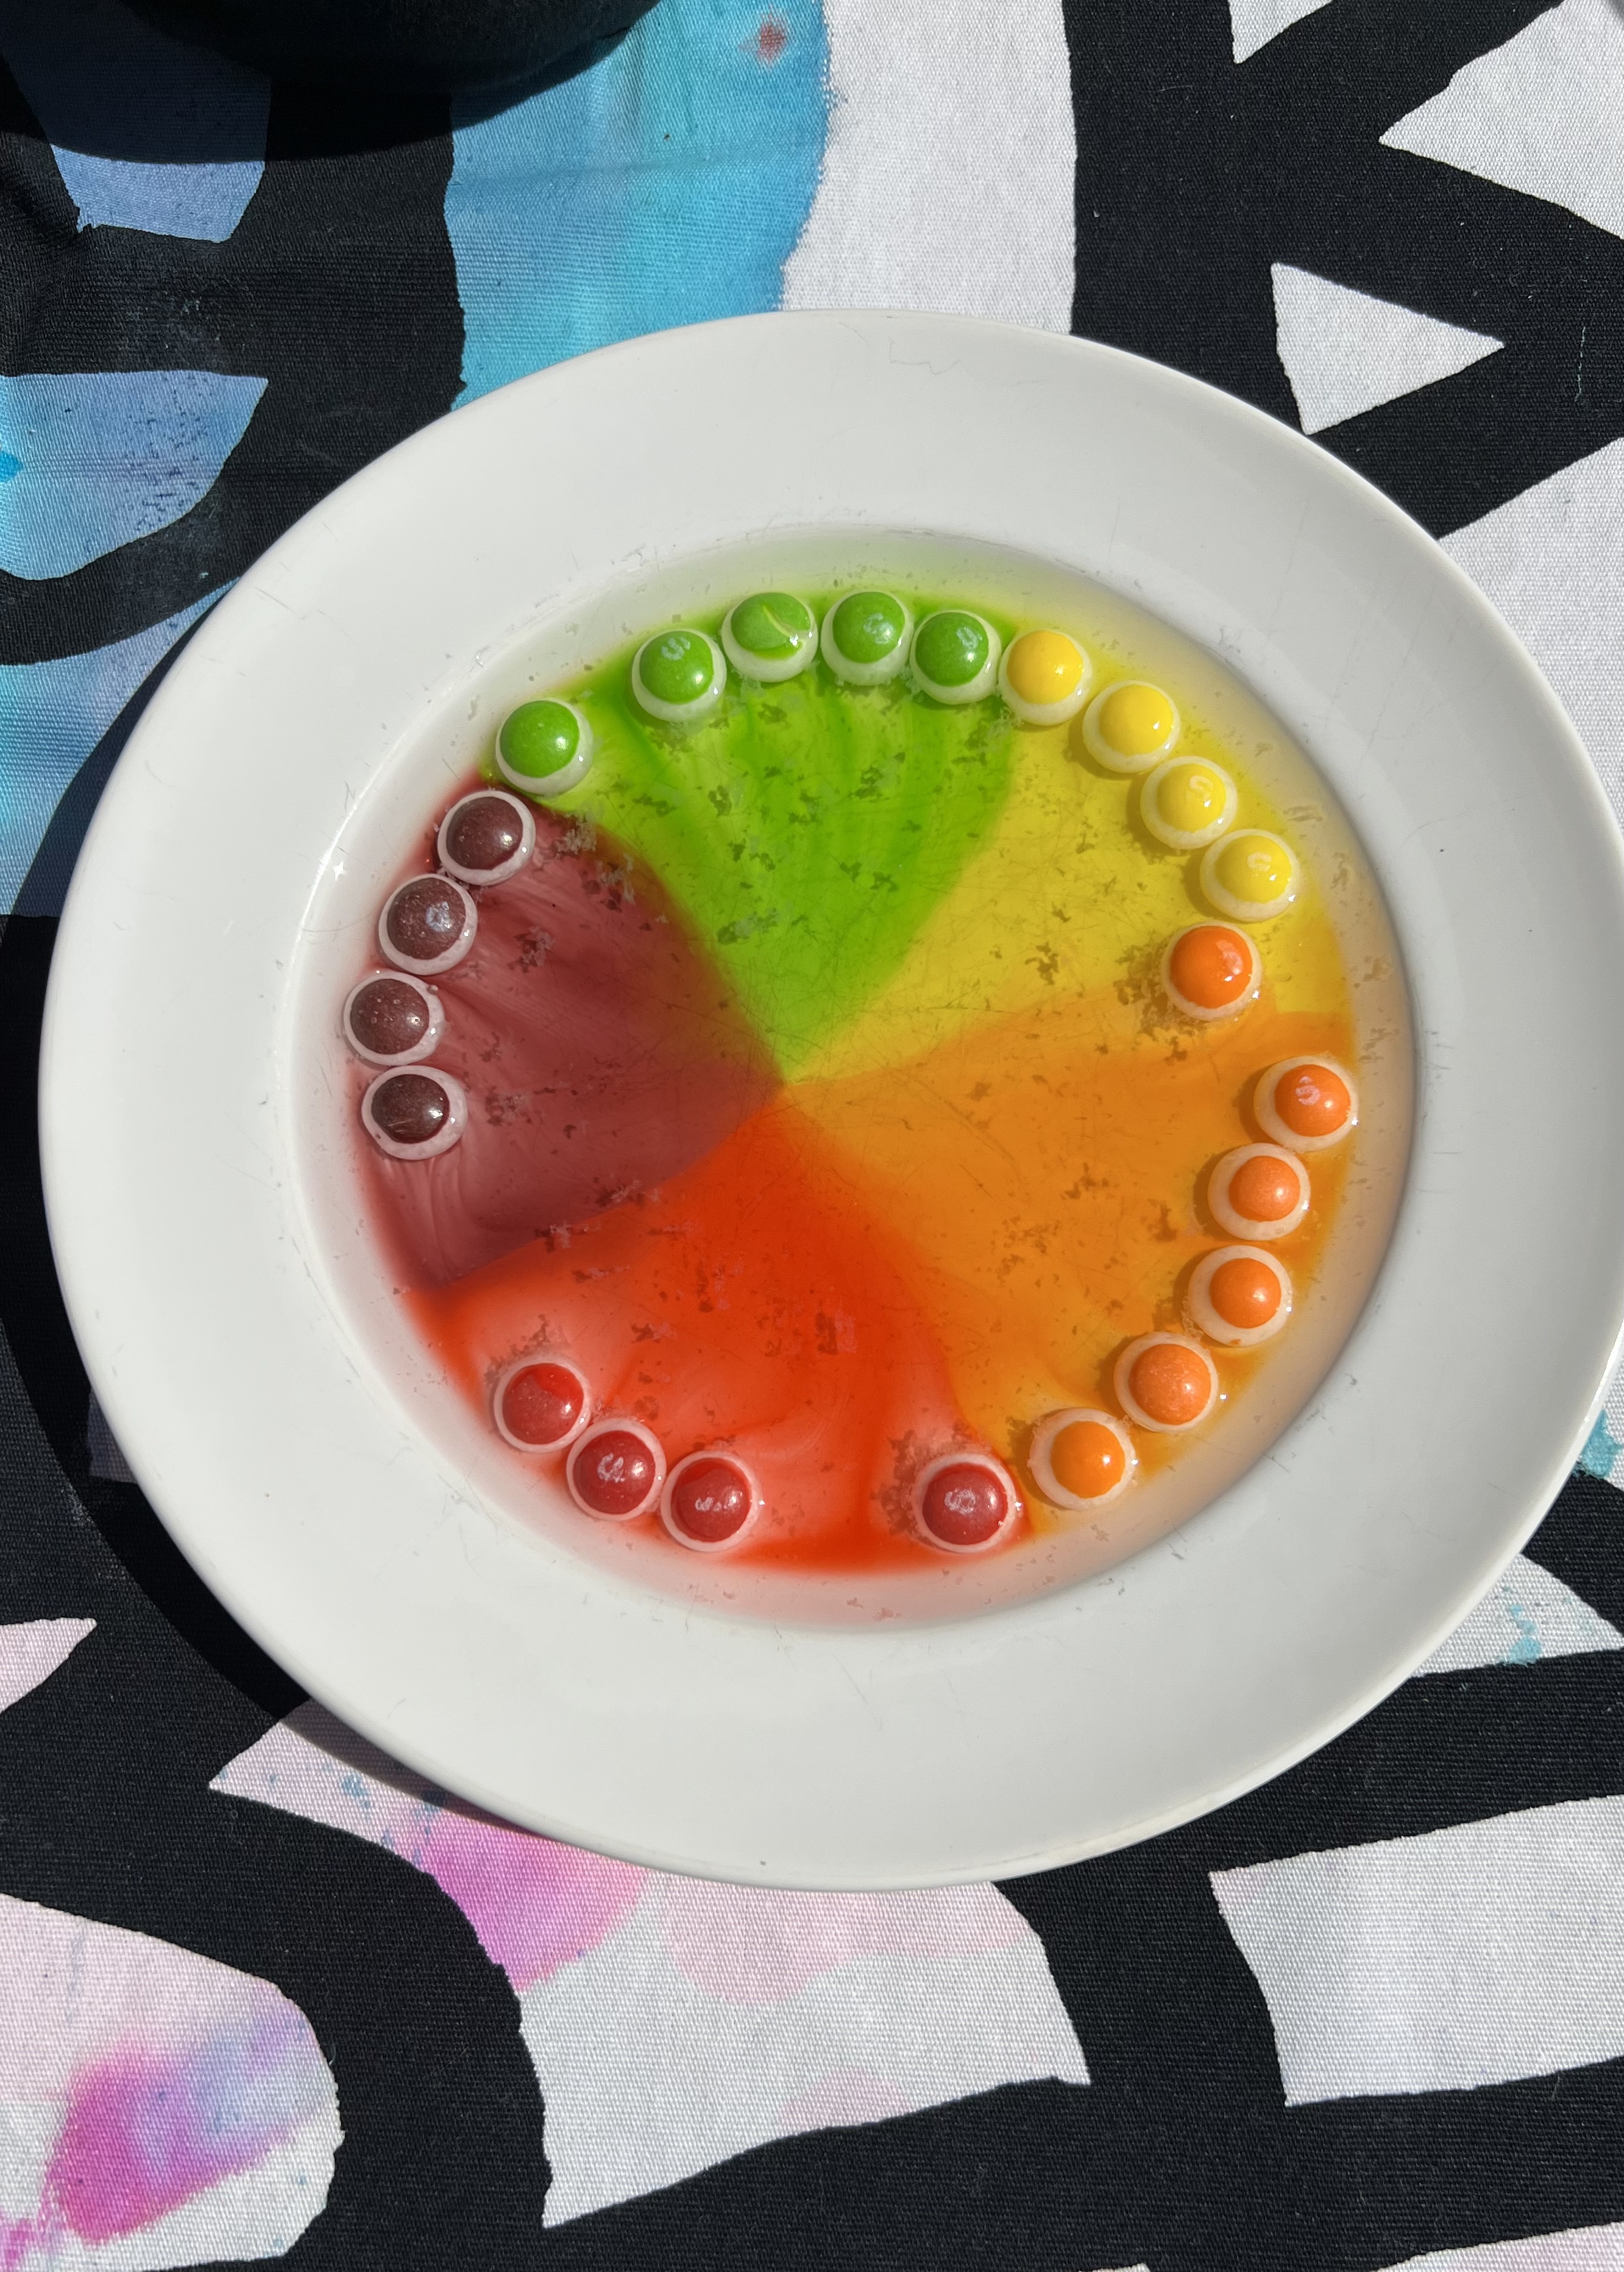
Our next experiment was a very simple and much less messy one. I'm not really sure if you'd actually call it a science experiment, but there was definitely a reaction so that counts, right? Skittles rainbows are super easy to create and are perfect for an art or rainbow party as well as a science party. In fact, we made Skittles Rainbows at Lola's Rainbow Unicorn Party years ago. You can check that out here.
Skittles Rainbows
Skittles candy
Warm water
White plates
This experiment really couldn't be easier. Simply place Skittles in a pattern on a while plate and pour warm water on top. Almost immediately the color from the Skittles will start to spread across the water and create a rainbow effect. This will also work with cold water but the effect takes a lot longer to work, so definitely stick with warm water. Don't they look cool? Eventually all of the color will fade off the Skittles and they start to dissolve into the water. But don't worry, they're still totally fine to eat if you choose!


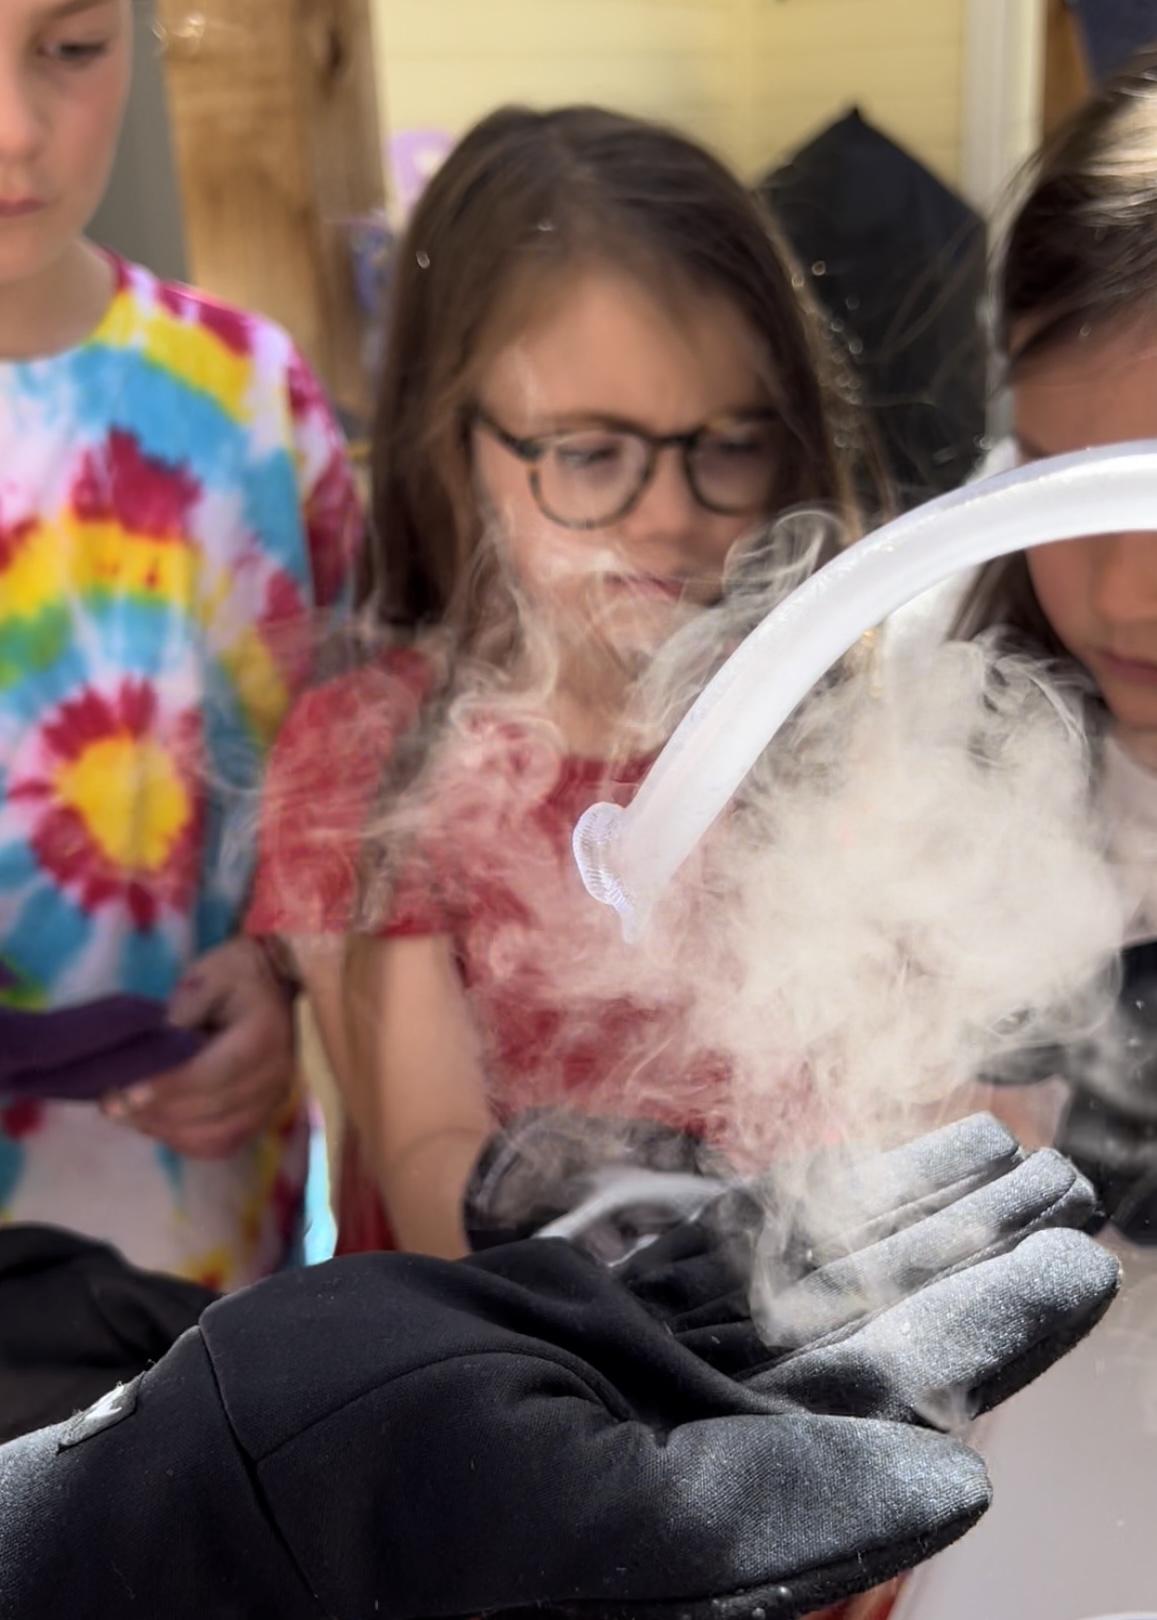
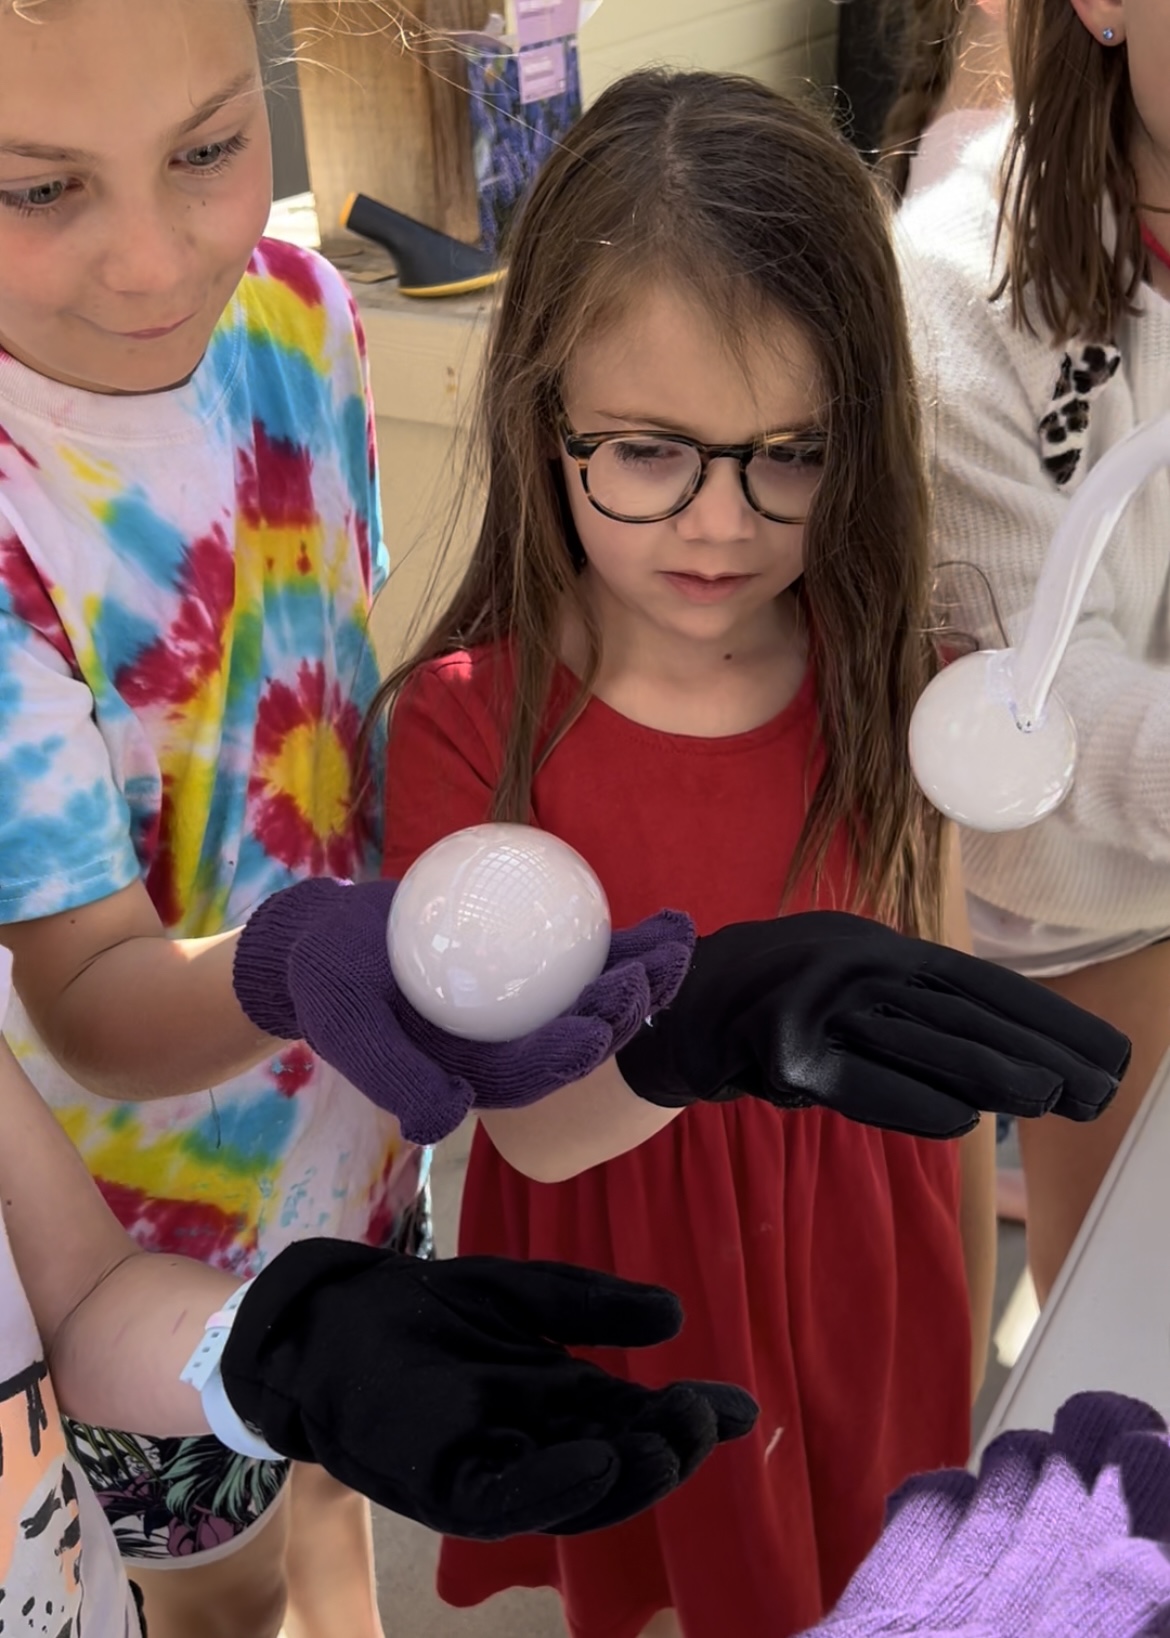
Our last experiment was one that came in a kit. Usually I'm a big fan of DIY when it comes to these sorts of things, but kits exist for a reason and they certainly make things easier. This kit was one that I kept as a surprise for Mathilde until the day of the party just in case I couldn't get my hands on the one ingredient we needed to add: dry ice. I'm so glad we were able to buy dry ice from our local supermarket (I know that not all supermarkets sell it) because it was a real hit with all the kids.
Dry Ice Bubbles
Dry ice
Cotton gloves
For this one you'll just need to follow the instructions that come with the kit. Fill the large container with warm water and a few pieces of dry ice. Mix the included detergent with water in a glass. With the lid of the water and dry ice container slightly ajar, dip the hose end into the detergent solution. When you lift it up a fog filled bubble will form on the end of the hose. If you're careful you'll be able to place the bubble on a gloved hand to hold until it pops. When the bubbles pop they release fog. This does take a little practice and we learned the hard way that you'll only be able to catch the bubbles with cotton gloves. The kit comes with a pair of cotton gloves, but because the kids all wanted to try it out at the same time I also grabbed extra gloves from the closet. We tried using polyester gloves as well but the bubbles popped instantly. But you know what, popping the bubbles was just as much a hit with the kids as catching them was.


That's it for all of our official party experiments. We had hoped to also make Ooblek and I had magnets and iron shavings for the kids to play with but we didn't have time to squeeze those in.
We did, of course, have time for a piñata and the birthday cake. Mathilde chose an atom as her piñata this year and I loved the idea of filling it with something that would (safely) make an explosion effect after we "split" it, but in the end I just went with good old candy. Confetti would've been great but I didn't think of that until after the piñata was fully made. This time I didn't over engineer the piñata and it broke after each kid had their turn of three hits. They scrambled to collect the candy as it spilled on the lawn, but as usual they all very nicely sorted it afterwards to make sure everyone got the same amount. Oh, and there was our traditional "wearing the destroyed piñata as a hat" photo shoot afterwards too. I really need to share a fun post with all those pics from over the years one day!


Last but not least, there was the cake. As I mentioned early, I made the cake to resembled a round beaker full of a green liquid with bubbles. It was a bit shoddy looking but the kids were impressed and somehow it didn't fall apart so I was pleased with that.

You can see all the fun of Mathilde's science party in action in the Instagram Reel below:


No comments:
Post a Comment